
The Essential Camino de Santiago Packing List
This article may contain affiliate links where I make a small commission for purchases you make from links that you click from this article. By purchasing through these links, you support me at no additional cost to you. Thanks for your support.
The Camino de Santiago is the ultimate epic hike. It’s an ancient pilgrimage route to the shrine of the apostle St. James in the Cathedral of Santiago de Compostela. There are dozens of routes that lead from all parts of Europe to Santiago de Compostela. However, the most popular route is the Way of Saint James or the Camino Frances.
I walked this Camino route solo a few years ago – not as a religious journey, but as an epic hiking adventure. It took 5 weeks and approximately 450 miles to complete this memorable walk, and quite frankly, I was ill-prepared for it! But I made it, and I took a lot of notes along the way so that others could be better prepared than I was.
Table of Contents
Read About My Camino de Santiago Journey
My Camino de Santiago hike was 5 weeks of a longer 3 month Europe trip, so I didn’t have the luxury of having all the right gear with me for the hike, so I made do with what I had. However, if you have the luxury of planning ahead and just taking what you need for the hike, then here are the essential items you should have with you to handle everything this long-distance pilgrimage can throw at you!


Camino De Santiago Packing List
Note, I walked the Camino in the spring, so the gear recommendations are more aimed at that time of year when there seems to be a bit more rain and cooler temperatures.
Books and guides
You don’t really need to have a guide, but if you are someone who likes to have maps and carry guidebooks, then here are a few of my favorites and the ones I saw the most frequently used on the trail. They can also be used to help you plan your trip.
|
|
|
|
|
|


Backpack
The first thing on every Camino de Santiago packing list should be a backpack. After 5 weeks of hiking with it every day, you become one with it. And strangely, at the end, you’ll feel naked without it!

TIP: The best way to test out a pack’s fit is to go to an actual store and pick out a few backpacks, put 15 pounds of weights in them, and wear them around the store for a while to see how they feel. You may feel dorky walking around the store for an hour or so with a pack, but you’ll be happier in the long run with a backpack that fits you perfectly and is comfortable for hiking 15+ miles day after day.
Size
As far as size, that’s also really dependent on how you are going to hike. Will you have your luggage transported for you, and only need a daypack? Will you carry everything with you? Will you take 4 weeks or 5? How much photography equipment are you taking with you? But the rule of thumb is you want to keep what you are carrying light – around 12 to 17 lbs if possible, no matter what the answers to those questions are – and that’s not easy!
I have found that the best hiking backpacks out there are Osprey and Arc’Teryx. I also love my simple REI daypack I have used for years as a cheaper option. If you just need a daypack and do a lot of photography, I love the Lowepro PhotoSport for a hybrid backpacking and photography pack. Or, as a final alternative, my friend Tom, who also completed the Camino, claims this is the perfect Camino de Santiago Backpack.
Weight
There are lots of things to consider when picking a backpack for the Camino. You’ll want something lightweight, with a waterproof cover and a pack with a waistband that transfers all of the weight to your hips instead of your shoulders. Those are the basics everyone really needs. However, the rest is very personal.

It works great for weekend trips, and depending on your packing style, it can go way further. The incredibly comfortable Exoform harness and AirSpeed ventilated suspension combine with trail-friendly features like Stow-on-the-Go trekking pole carry. Ultralight doesn't have to mean uncomfortable, and the Exos proves this.
I used this Deuter Aircontact Core 45 + 10 pack on my Maine Hut to Hut trip. It’s 55L, can hold a sleeping bag/quilt, and has space for multi-day hikes. This is the perfect size for multi-day hikes where you aren’t carrying a tent (think Camino de Santiago, St Olav Ways, Hut to Hut hiking, etc). This particular pack is part of Deuter’s women’s series because women are built differently than men…duh.
It has a Vari-Slide System allowing exact adjustment to every back length, ensuring the pack sits perfectly on your hips. Plus, the waist belt also moves with you as you step, ensuring comfort for long-term wear. I carried about 33 pounds in it for my Hut to Hut hiking in September, and it worked great. I had no back or shoulder pain, and the back ventilation system kept me cool. I’m a believer in packs designed for women!

Perfect for multi day hut to hut hikes where you are carrying more gear. The Vari-Slide System allowing exact adjustment to every back length, ensuring the pack sits perfectly for women of any size.
TIP: Bring ziplock freezer bags to store gear inside your backpack for extra protection! Put your phone in it, food, socks, whatever you want to protect when there’s a downpour.
Daypack
If you only really need a small day pack because you are having your other gear transported, but you have camera gear to carry, the Peak Design Everyday Backpack is a great option. I love the fact that it’s weatherproof – I don’t need to carry an extra rain cover. I used it in the Galapagos in the rain, and everything stayed dry.
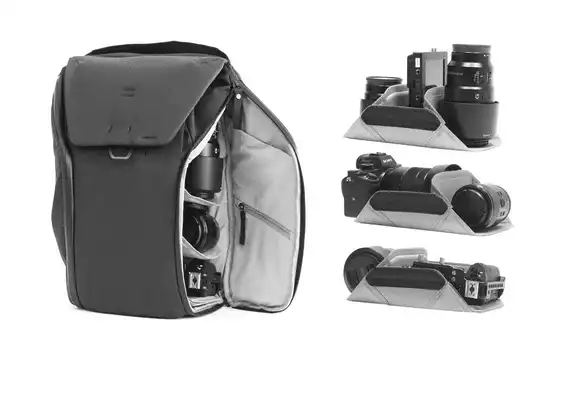
The Everyday Backpack is built around access, organization, expansion, and protection. I like it because in addition to safely carrying camera gear, it also can fit in extras like a rain coat, laptop, and snacks. Extra space is so important! The water bottle pockets can fit a variety of size bottles and it will also fit the Peak Design travel tripod easily! It has lots of handles which is great for travel and I love the 2 side openings making it easy to use in the field. Finally - I love the fact that it's weatherproof - I don't need to carry an extra rain cover. I used it in the Galapagos in the rain and everything stayed dry.
Find the best camera bag based on your travel style
Luggage transport
There are a variety of options for luggage transport. I used JacoTrans, which is the only company that transports along the COMPLETE route of Camino Frances when I did it in 2012. It was worth it to me to work with one company for the entire time.
If the walk is part of a bigger trip and you don’t need everything in your pack, you can also transport your bag or items from the beginning directly to Santiago to be stored until you arrive. Check the Camino forums for options for transporting luggage to Santiago.
Boots vs. shoes
This is always a big debate; each choice has advantages and disadvantages. Boots provide more support, but they are heavy, and technically, you aren’t really hiking and scrambling; you are just walking. Most of the time, you are on even surfaces, and you aren’t crossing rivers. Less bulky tennis shoes are, of course, lighter and breathe better; better suited for long-distance walking.


I hiked the trail in tennis shoes, specifically Saucony trail running shoes. You don’t need to use heavy boots if you don’t want to. However, there are days when the weather is bad, when tennis shoes can be frustrating on really muddy trails. When it rained, I had a lot of issues keeping my feet dry and wished I had hiking boots; however, most days, I was pretty happy with my lightweight trail runners. Of course, maybe the ultimate answer is to use some sort of hybrid shoe.
Check out my complete list of essential hiking gear I recommend for all of the hikes I write about.
Shoes are a very personal decision for each person. I’m a huge fan of OBOZ boots – I think I have three pairs! I prefer the Oboz Bridger Mid for a heavy-duty hiking boot. The Bridger Mid is their heavy-duty waterproof boot that would be perfect for those wet, muddy fields of the Camino! These are so comfortable, I wear them on the plane! What I loved most about the Bridgers was the high-quality insole providing incredible support. AND they plant a tree for every pair of shoes sold!
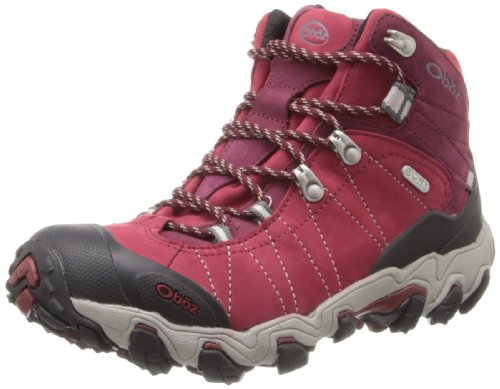
My favorite hiking boot. I have hiked with them all over the world. Rugged boots with great footbed support. Sole is great for rocky trails, and the color is pretty cute too! Great for hard hikes and thru hikes.

A great hiking shoe by my go-to hiking shoe company Oboz! This is a great option when you don't want to pack the mid calf version and want to save a little space. This is as rugged as a regular hiking boot with great tread and arch support!
If you are looking for a ‘low-top’ option but still want the heavy-duty support, give the Oboz Women’s Sawtooth Low BDry Hiking Shoe a try. It has a nice, roomy toe box and a thick sole.
Regardless of tennis shoes or boots, you will definitely want a comfy pair of shoes to switch into at the end of the day. I used Chacos, but you could also use flip flops or other comfortable shoes of your choice!

These Z1 classics are my rest and recovery shoe for hiking. When you can't wait to get out of your hiking boots and into something cooler and more comfortable - I use my Chacos! These are also perfect for any kind of water adventures like rafting or kayaking.
TIP: Whatever footwear you bring with, make sure they are broken in. Wear them religiously for months before the hike!
Socks
My feet sweat a lot – but I’ve found a solution! Smartwool socks are GREAT for travel. They dry really fast, don’t hold odor, and stay warm in the cold and cool in the heat. Because they don’t get smelly, I only have to take a couple of pairs in my backpack. I run in them, hike in them, and wear them to bed when my feet are cold, and I have no one to snuggle with. They are the only socks I travel with!

Merino wool offers moisture management, thermoregulation and natural odor resistance - which makes i perfect for traveling. Smartwool has socks for hiking, biking, and everyday. They also come in an array of lengths and cushioning.
Gaiters
I didn’t know what gaiters even were until I hiked Kilimanjaro, but once I started using them, I found them essential for long hikes where you are in the elements! Gaiters cover the vulnerable tops of your shoes to protect your feet from the elements (rain, pebbles, mud, etc). They can work for boots or tennis shoes.
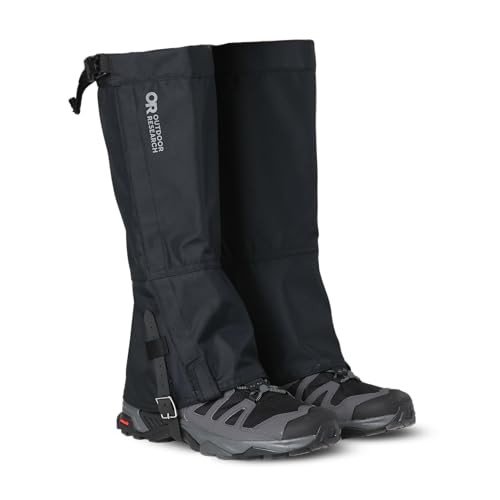
The Rocky Mountain High Gaiters II are water-resistant and designed for on-trail use, featuring an updated fit and pattern to be used with various boot profiles.
Have a friend going hiking? Check out these great gifts for travelers.
Hiking clothing
The clothing you bring should be lightweight, dry fast, and allow you to dress in layers. Drying fast is essential since you are often washing out your shorts or trousers and hoping that they dry overnight! I like the travel clothing gear brand Exofficio. I use their hiking pants, shirts, and pullovers. Since this is a travel clothing company, they are made to be light and dry fast and be super comfortable. Plus, many of their items have special protections: Bugs Away Clothing and Sun Guard Clothing with SPF 30+.


Poncho
I know many people bring complete rain gear for protection from the weather. That’s a great solution to staying dry. However, it’s also bulky. I simply used a big rain poncho for my rain protection. I hiked in the spring, so the rainy days were still warm. It worked just fine to use the poncho and hike in my shorts. Ponchos give you the most mobility, and are small to fit in your backpack! Plus, they not only cover your body, but they also cover your backpack and camera gear. In one easy process of putting on a poncho, you and your backpack are completely covered!

A multi-functional poncho can be used as a floor mat, a cape, a simple shelter, and a canopy. The grommets in each corner can be used as an emergency shelter or to cover goods, such as backpacks or other camping gear, and the hook and loop fasteners on both sides of the cape can be used as a sleeping bag cover.
Learn what to pack when traveling in the rainy season
Underwear
Of course, you need to pack underwear, but you don’t need to pack ten pairs – you really only need about 2 to 4 if you use ExOfficio underwear! These are the best on the market when it comes to travel underwear. However, I honestly have no idea if they have any competition! Who in the world specializes in travel underwear?! ExOfficio does. Why are these underwear special? They dry super fast – which means you can only take a couple of pairs and wash them out in a sink at night, and they will be dry in a couple of hours. Seriously – I’ve done this many times! Plus, they are comfortable. And if you want to vamp it up, you can forgo the sporty ones I get and get the lacy thongs if you wish!

ExOfficio has lightweight, breathable, quick-drying, sweat-wicking underwear for every adventure.
Hiking Poles
You don’t really need hiking poles for balance or steep climbs and descents on the Camino, but they are really great to have to create a rhythm. Plus, they actually speed you up, too, by simply allowing your arms to help propel you forward and upward, which tends to increase your speed.

Super lightweight and easily folds up to fit in a suitcase or backpack.
Water bladder
You need at least 3 quarts of water per day when walking. It’s a good idea to drink plenty of water before your hike to get your body well-hydrated. Take water bottles or a water bladder that has a straw, and you can hike without having to stop to drink. I have always preferred the water bladder solution as I tend to drink more frequently because it’s so easy to do, and I don’t have to stop walking to drink!

This is the best water reservoir I've used. It's big opening makes it easy to fill in any sink and easy to clean, and I love the tube that comes in two parts making it so much easier to put in and out of your pack! They've really thought of everything!
TIP: You won’t have to worry about clean water; you can buy it along the way. Or better yet, save money and simply fill up at the numerous fountains you’ll find along the trail. Just make sure you look for the sign on the fountain; if there is either no sign or a sign that says, “agua potable,” then it is alright to drink this water. Do not drink the water from a fountain that says, “nonpotable” or “agua sin garantia sanitaria.”
First Aid Kit
Even though there are plenty of pharmacies along the trails in the villages, I would recommend that you take a small first aid kit too. I spent a lot of time in pharmacies trying to constantly manage the blisters on my feet.

One of the most popular solutions was Compeed Blister Care patches. The patch looks like a bandage, but it operates a little differently. It absorbs all the moisture from the blister, but over time, it becomes more permeable, so the wound dries out. You keep it on for days until it finally dries out and falls off. Make sure you don’t pull it off early as I did – you’ll end up in a worse situation!

I also used Vaseline for blister prevention. I learned this trick when I used to train for marathons! Just put some on the areas that typically rub and get blisters, and then make sure you reapply throughout the day.
Silicone earplugs
If you plan to stay in albergues and sleep among the masses, then you should be prepared with earplugs. However, don’t bother with those soft squishy ones; use silicone earplugs. I was actually introduced to these by another pilgrim on the trail. He gave me a pair, and I used them, and it changed my life! The silicone earplugs block so much more noise; I didn’t even hear people getting up and packing around me in the morning! You can use them for a few days and then replace them with another pair.

Mack’s soft, moldable silicone putty molds very comfortably to the unique contours of any ear. These multi-use earplugs are great for sleeping, snoring, swimming, studying, bathing, traveling, loud events, concerts, flying discomfort, motorcycles, etc.
Sleep sheet
If you are planning on staying in albergues, it’s really nice to have a sleeping sheet. A sleep sheet is basically a sleeping bag liner – just a nice little layer of warmth and protection between you and the sheets. Granted, I never stayed in a questionable, dirty albergue for the entire 5 weeks, but there is something nice about having your own little cocoon.
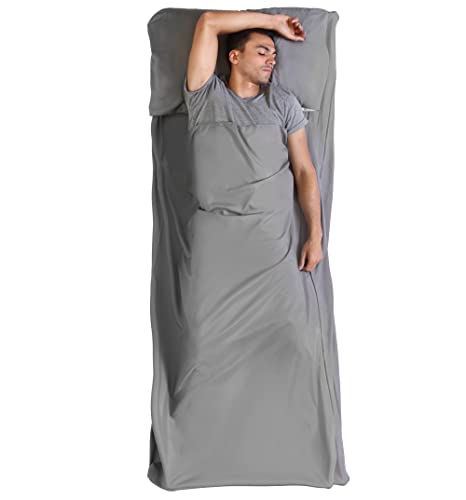
Protect your sleep away from home with Tough Outdoors’ XL Sleeping Bag Liner. Just slip this liner into your sleeping bag to extend its life. Or use it as an extra sheet when couch surfing or hostel jumping.
Travel towel
Albergues don’t furnish towels, so you’ll want to be sure to bring your own. A travel towel that is light, dries quickly, and takes up as little space as possible!
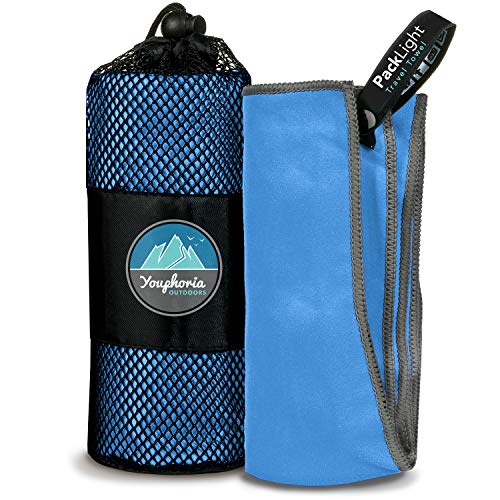
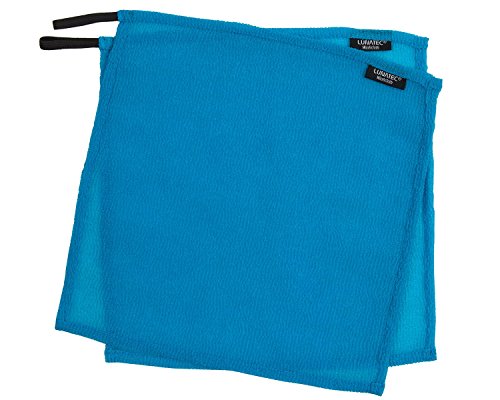
You might also want to consider bringing along one of my favorite travel items – a quick-drying washcloth. I have been carrying a Lunatec Wash Cloth for 5 years now, and I love it. It is sort of like a flat loofah sponge, and it dries quickly and never holds any odor. Perfect for travel!
Pinless travel clothesline
Doing the Camino means packing light and washing often. Laundry gear is necessary on your packing list. Normally, all albergues have some sort of laundry facilities and clothesline, but many times it’s hard to find space on them as everyone is washing items nightly. Bring your own pinless clothes line, and you won’t need to worry about space on the line!

The Travel Clothes Line makes it easy to rinse out a bathing suit after a swim or other items as needed with a simple drip-dry system. Ideal for travel. This compact clothesline allows you to wash clothes at night and have them dry by the next day. Easy to pack.
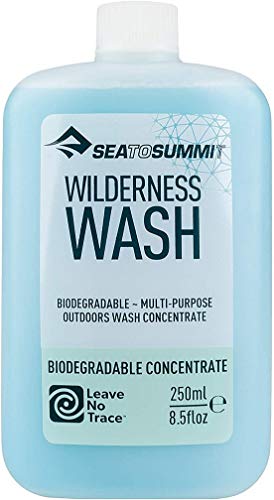
You also should consider a little bottle of super concentrated travel laundry soap for hand washing things in sinks like this Sea to Summit Liquid Laundry Wash.
TIP: If you don’t bring a line, then consider bringing a few clothespins and using the outdoor lines at the albergues. There are seldom enough pins available, and if the lines are full, you can still pin some clothes up in other places – or onto your backpack as you hike the next day!
Photography rain gear
Don’t forget that you need rain gear for your photography equipment, too!
Lose the plastic bags and get a proper rain solution for your expensive camera gear. If you are hiking with a camera, then don’t forget that it needs rain protection, too! I use a LensCoat Raincoat, so you can take pictures in any weather. Make sure to check out all of their sizes – one will be right for your camera!
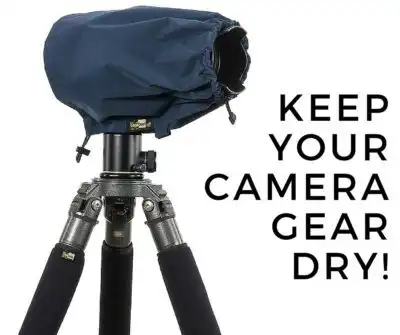
Don't let the weather stop your photography! This innovative cover provides protection for your camera and lens from the elements like rain, snow, salt spray, dirt, sand and dust while allowing you easy access to the camera and lens controls.
Are there things I forgot in this Camino de Santiago packing list? Share your thoughts in the comments below! However, do keep in mind – less is more – stay minimal, and you will be a much happier pilgrim!
My Camino de Santiago Experience
I wrote a blog post about my experiences from the previous week and what I learned from them. If you want to see how I evolved throughout the pilgrimage, check out these posts:


Hiking Pilgrimages Around the World
Ever since I completed the Camino de Santiago solo, I have been on a quest to find the great pilgrimages or multi-day hikes around the world and do them. These are all places where you can stay in real beds and have your luggage transported!
Here are a few I’ve done so far – but I have many more on my wish list.


Disclosure:
This list contains some affiliate links. If you choose to purchase items through these links, I will earn a small commission at no extra cost to you. These commissions help reduce the costs of running this site


Good list, although I have found SmartWool quality has gone downhill recently. I have SmartWool socks that are 8 years old in great shape, but those I’ve bought in the last 2 years don’t seem to last more than 1 season. I’ve switched to Injinji/toe socks this year as I tend to get blisters between my toes!
Interesting I have found a few other people who have said that too. I haven’t had any issues recently – but will check out the toe socks you mentioned…though I’m not too sure I’d be comfortable in toe socks! But I suppose to blisters they would be better! Thanks!
Fantastic write up. Very helpful and saved me days of search and decisions. Thanks for sharing.
I am preparing for September 2018 walk along the French Way. One year preparation looks too long, but that’s the way I am.
I am grouping interested parties who want to walk with me – and your website will be shared with all as The Bible.
Patric – so happy you found the articles useful. It’s never to early to start planning!! Let me know if you have any questions in your planning!
Great blog and I found it very helpful. I am solo walking May/June 2018 in spring. Do you have any suggestions on how to carry money / currency? Kindest regards Lisa
Exciting – you’ll have a great Camino at that time of year! The medium to big towns had ATMs – and I would just take out what I needed for a couple of days at a time so that I wasn’t carrying a ton of cash with me at once. And I’d just get money out when I needed it. The prices for pilgrim meals and Alberges are pretty consistent so you can budget it out for a few days at a time and be ok. I don’t carry a money belt ever – so I just carried my cash with me in my backpack or in a pocket. HOpe that helps!
Awesome list. I’m doing the Camino in April with a group of 16. I’ll be doing the last 100km and then repeating again with another group in October. I’m doing this for readers of my books that want to go on an adventure to shift their way of thinking/living just as I did years ago. I wish all readers of this a Buen Camino!
how exciting! Have a great walk and shifting people’s way of thinking! The camino is a great place to meditate on such things!
I’m planning to hike the Camino late May, early June 2019,. Do I need to make lodging reservations ahead or does the trail support tent camping through out the journey? Any and all ideas and suggestions about hiking the trail are appreciated.
I’m not entirely sure if reservations would be necessary at that time. If you are doing the entire walk – then I def. think that reservations will be required for the last couple of weeks as the last 100km is very busy on the trail at any time. I normally made my reservations that morning or the day before if I needed to. I don’t actually know about tent camping – sorry! Did you see my other article – this may be of some help – https://www.ottsworld.com/blogs/camino-de-santiago-faq%e2%80%99s/
Great list and tips! I hiked a part of Camino de Santiago a few years ago, and I have understood that a good, sturdy backpack is a must. I’ve got Deuter Futura, too, and it was great. One of my hiking buddies had a cheap (brand new) backpack, and it broke halfway. 🙁 I had my hiking boots, and I’m glad I did because I did the hike in late April/early May, and it rained often… The trails were muddy. However, I would opt for something lightweight and more breathable if I were to hike during the summer.
I agree with you that hiking poles actually make hiking easier.